01 March 2021

Warmth where you want it – and in total silence!
Wall heaters are among the best winter warmers in which you can invest because they not only provide warmth, but they do so at reasonable capital cost, reasonable running costs, and best of all… they do not reach temperatures that can cause harm. That makes them ideal for a home with children…
Panel heaters have a number of advantages over other types of heaters – though oil heaters share many of the features of panel heaters in their operation… silent operation, very few moving parts, using their surface area heated to a moderate temperature to warm the environment, and so on.
But here we are looking at a panel wall heater…
- Due to their design and unlike other heaters that employ ceramic bars, fans or burn LPG, these heaters do not use up oxygen. That makes them safe to leave on while the occupants are asleep as these panel heaters do not remove oxygen from the air.
- Provided these heaters are cared for properly, they are highly reliable, because due to their design there are no moving parts such as fans to eventually fail and there are no exposed heating elements, so no dust can collect on the elements and cause them to burn out, or in some cases, corrode. And they are very easy to keep clean and dust-free… dust is easily swept off their flat surface.
- These heaters are completely silent… perhaps one of their best features – so there are no whirring fans, sound of LPG hissing away as it burns. And because there are no moving parts this makes them a great choice when you want peace and quiet to read a book, or not want to have to up the TV’s volume over the sound of a fan. The only moving part is the On/Off switch.

- These heaters are safe for children and pets … no hot elements are exposed and because these heaters have a large surface area – around 360cm² (the panels are approximately 60x60mm on each side) the surface operating temperatures are generally only in the range of 75-90°C (depending on ambient temperature) in the centre and on the one used in this project, become progressively cooler towards the edges – to the extent that in this instance, the corners remain cool – the illustration depicts this surface temperature gradient. Towards the centre, however, the surface is hot enough to cause discomfort and you won’t want to keep your hand on the surface, but it is not so hot that it would actually cause tissue damage. This is because as the fibre-cement is a poor thermal conductor, not enough heat is transferred from the hot surface for your skin to become burnt. Having said that, obviously one would not hold their hand or any part of the body against the panel for any time at all.
- These heaters warm the whole room without drying out the air.
- These panels do not pose a health risk as they do not contain hazardous materials such as asbestos, or a fire risk – which can be the case if flammable material falls on a ceramic bar heater, for example. Having said that, good ventilation around the panel is essential and all normal safety precautions should be followed.
- They have a slim and compact design, can be mounted on a wall, saving on floor space and be painted with an emulsion or PVA paint so that they blend in to the décor by matching it.
- They have the capacity to warm a room of about 12m².
Having said, naturally, as with any heater, space/wall heating panels need to be operated properly – to repeat, by following all sensible precautions such as keeping children away from them, ensuring proper ventilations and so on.
Of course, as these panels are designed to be mounted on a wall, you need to situate them in a place where they will do the most good, as that is where they are intended to remain.
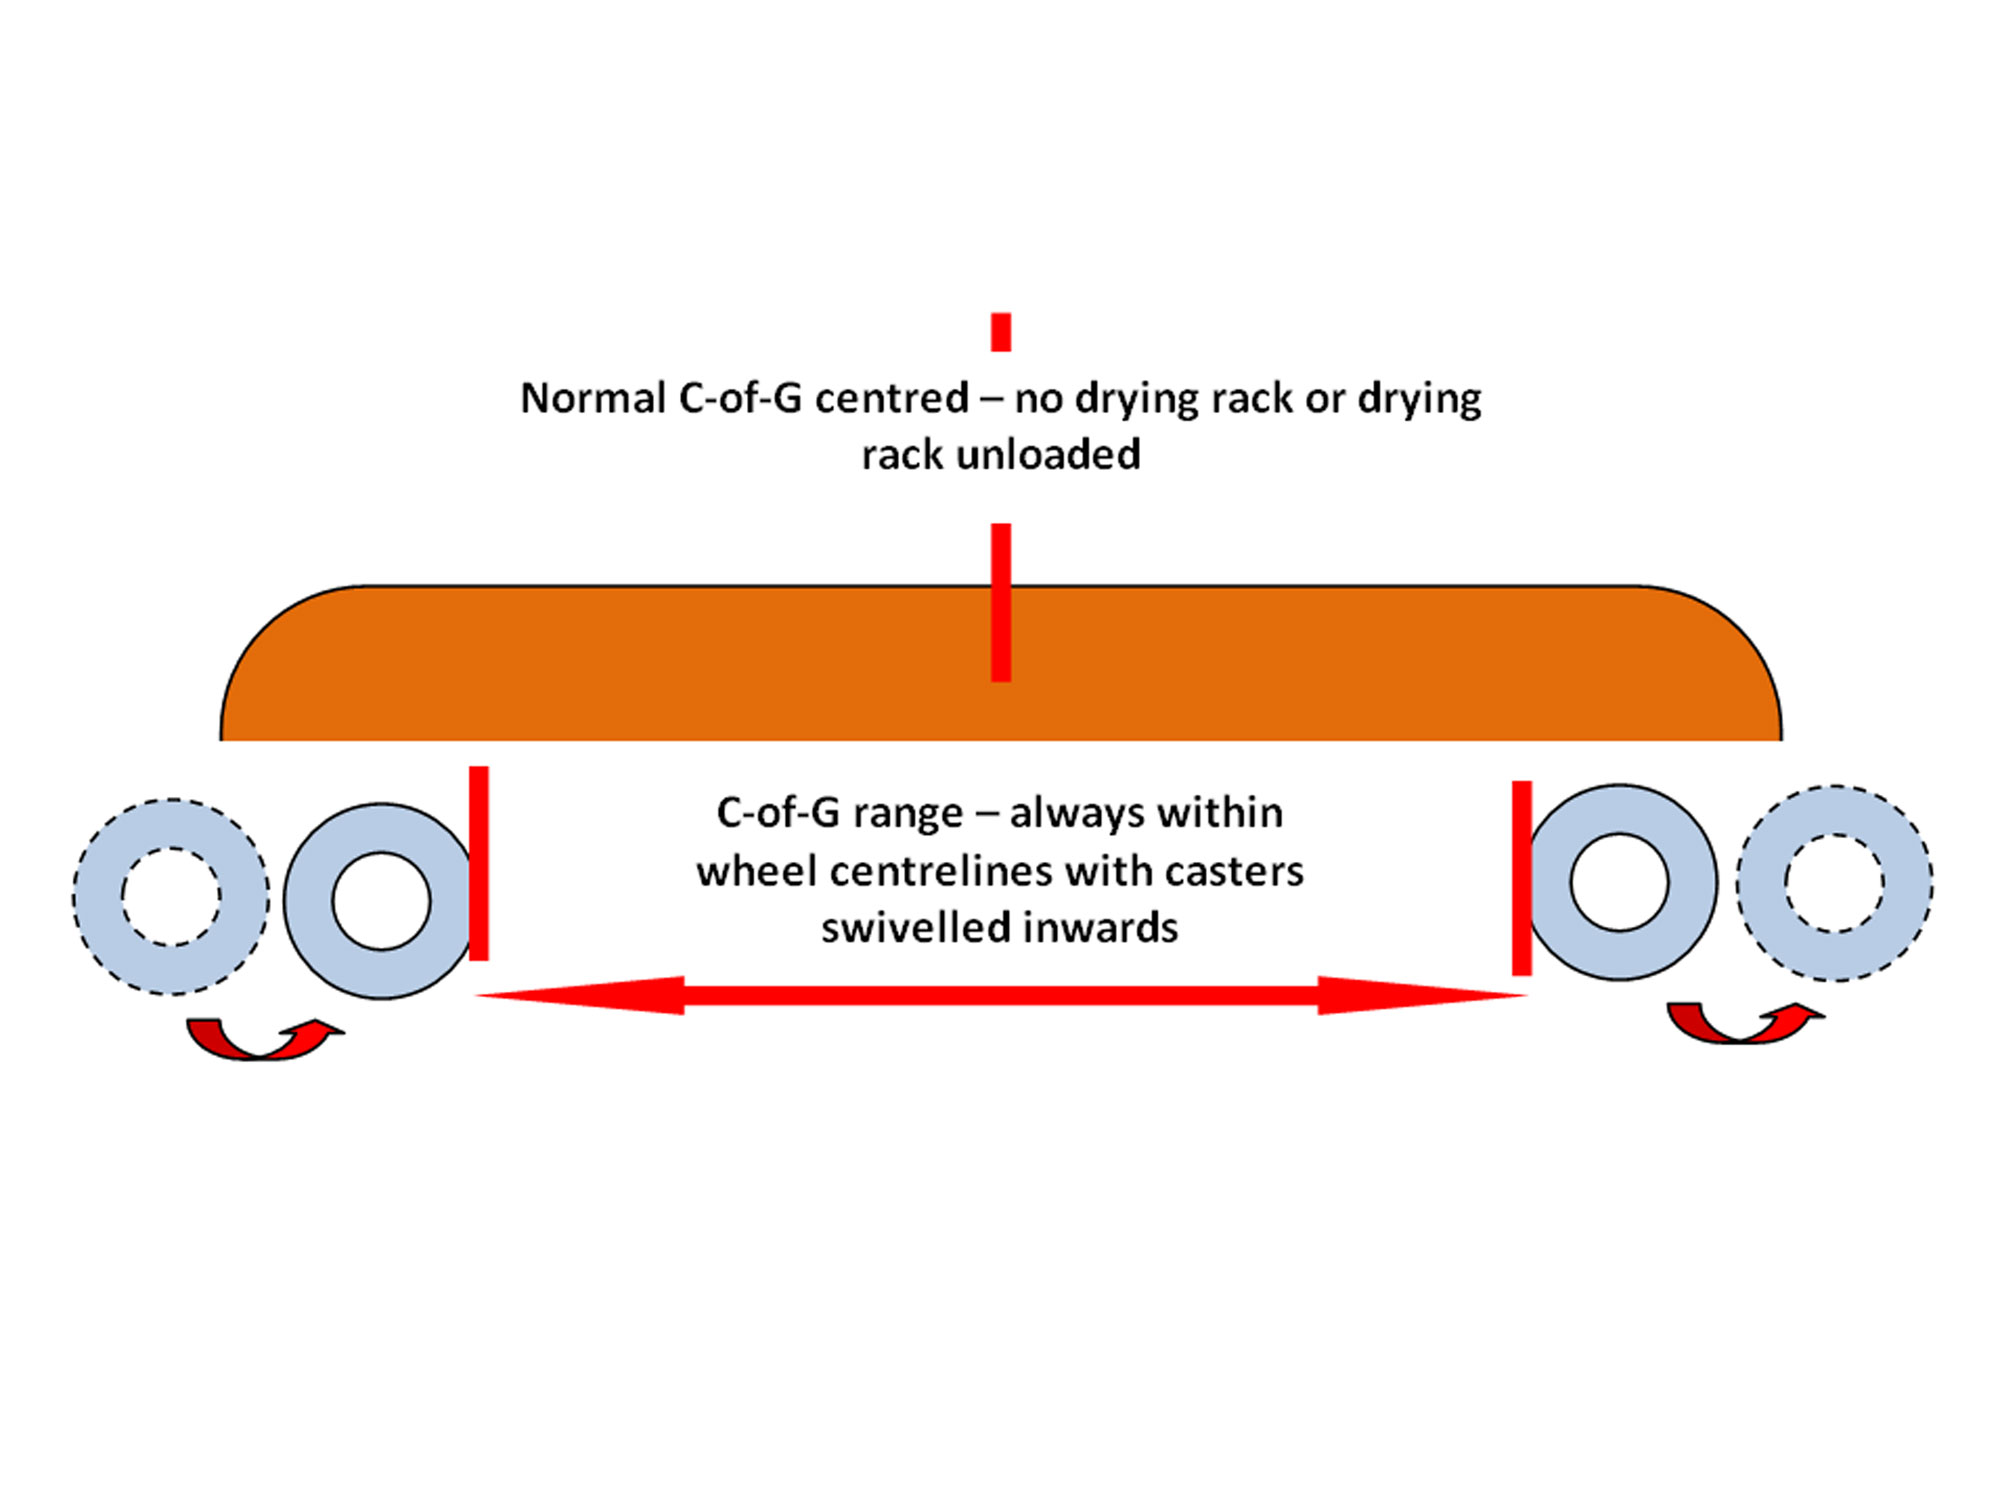
And that is where this project comes into play… by mounting a panel on a wheeled frame you can move it to wherever you are and store it away safely when warm weather returns.
I made a point of contacting two manufacturers of these fibre cement wall-mounted heating panels to check whether they advise against doing this and received the following response from one of them – ‘Must be seasoned hard wood and good ventilation’. There is also at least one company that produces a panel heater mounted in a frame, so it would seem that provided you do it properly, there should not be any safety issues.
But before I begin…
DISCLAIMER & CAUTION… please note:
First of all, I need to stress that as with anything electrical, unless you are absolutely certain of what you are doing… DON’T!
Secondly, you should follow the advice below…
- If the panel is damaged in any way… cracked, damaged surface… discard it.
- If you are unsure of any aspect of the construction, unsure of any aspect of this project, do not attempt it.
- The panel must not be strained or flexed in any way and should it be damaged… cracked and/or any of the surface broken away while making this project, discard it – do not attempt a repair.
- Your attachment of the panel within the frame needs to be precise so that at no stage during or after assembly or during operation is the panel itself ever under any stress.
- Do not alter or tamper with the electrical components of the panel itself… for example by attempting to substitute the fitted power cord for a longer one; leave the electrics alone.
Right, let’s begin. In my case I did not use seasoned hard wood but rather SA pine, but I made the frame large enough that the panel does not actually touch it and so good ventilation is assured.
In fact, on all sides there is a gap of approximately 20mm between the edge of the panel and the inner surface of the frame. This not only provides very good ventilation, but also ensures that no part of the panel is even close to the frame. (In retrospect it would have been better had I simply enlarged the frame by 4mm or so, and made the gap 22mm on all sides – then I would not have had to cut the 20mm spacer blocks and instead simply used 22mm offcuts as spacers. Live and learn.)
Materials:
One fibre cement wall panel. The one I used is 595mm on each edge
SA pine:
- Two 1.8m lengths of 32x32mm cut to two top and bottom frame members, each 630mm long, and two side frame members each 695mm long
- One 1.8m length of 44x22mm (or an offcut thereof), from which two feet, each 272mm long, were cut
Meranti:
One length of 8mmØ fluted dowel
Wood glue
One polycarbonate clear burglar bar – 32x5mm
One 5mmØ threaded rod
Sixteen 5mm chromed dome nuts, plus washers
One roll of electrical insulation tape (I chose white to match the finish) rated up to 600V and 70°C operating parameters
Four 40mmØ nylon casters
Thirty-two 19mm wood screws – to attach the foot brackets and casters
Four steel shelf brackets
One handle
Two 40mm x 4mmØ handle attachment screws and 12mmØ washers
Finish of your choice; I used water-based white paint
Method:
- First measure the panel to confirm its exact dimensions.

- Now measure the top and side frame members. As mentioned above, I made the outer dimension 695mm – it would have been easier and far more sensible to have made it 700mm and be done with it. Again… live and learn.

- Cut the frame members. Note that in this case to ensure the joins have no chance of pulling loose, the side members are the longest; the top and bottom members are each 64mm shorter than the former so that they fit between them – this will be come clearer below.

- You must ensure that the edges are precisely 90° – dry fit them to check.

- Mark the centre of each end of the side members as shown here.

- Drill an 8mmØ hole through each end at the centre point.

- Now clamp the side and top members together as shown here.

- I used a saddle brace to ensure each piece was precisely aligned.

- Now drill through and into the top and bottom members as shown here.

- By marking each join – A-A, B-B, C-C and D-D, you will ensure that each frame piece is properly matched to its mate. This will also ensure that the dowel that you insert to secure the join passes through perfectly aligned holes. The dowel is trimmed about 2mm proud of the surrounding surface and then sanded down flush once the glue securing the joint has cured.

- To confirm your frame is an exact square, measure the diagonals as shown here – if they are identical, your frame is exactly square (this check also works when constructing rectangular frames or square or rectangular panels).

- I cut 20mm spacers from a piece of SA pine left over from a previous project; as stated above, it would have been easier to just enlarge the frame by 4mm and use any old wood, as long as each is 22mm thick.

- Making and using spacers like this ensures that you keep the panel dead centred within the frame while marking off holes to drilled etc.

- Mark the centre of the hole in the panel and transfer the mark to the frame.

- I rounded off the top corners of the frame – my artistic ‘flourish’; the bottom corners are left square. I used a small paint container to mark off the curve.

- Cutting outside the line, cut the curve.

- Then finish it off by sanding it smooth.

- Back to those panel holes… with the centre line marked on the frame, I marked a line on either side of it, 16mm from it, as the sides of the recess that I would make for the polycarbonate panel attachment strips.

- If you are using a router to cut the recess, it’s a good idea to clamp a guide to the frame, as shown here.

- Fit a square-cut bit to the router and set the 5mm depth required by placing the router on the polycarbonate strip, pushing the bit down until it reaches the surface on which you are working, and lock the router. Then set the router depth-stop to that setting, and release the lock. This is so that when routing the recess, you can do it progressively… routing to 3mm or first, and then to the full 5mm as required… it’s not a good idea to rout the full 5mm depth in one go.

- Using the router to cut the recess. You can use a chisel to make the recess, but a router is quick and easy and gives a very neat result.

- One recess complete – and the strip fits perfectly.

- Now transfer the recess dimensions to the other surface of the frame and repeat the process.

- Job done!

- I cut each polycarbonate attachment strip to 90mm.

- The corners of the end of each strip on the panel side can be rounded off slightly for an improved aesthetic appeal, but in the meantime ensure that all are exactly the same length.

- With the panel positioned within the frame (note the use again of the spacing blocks to keep it centred), mark the position of the hole you will need to drill through the strip, so that it aligns perfectly with the hole in the panel.

- Placing a piece of wood as shown here helps you to ensure the hole in the strip will be centred exactly on the hole in the panel.

- Drill a 5mmØ hole in the one end of each strip as shown here – 16mm from the end and centred.

- You can repeat the holes on the other ends as well.

- Clamp each strip in turn into its recess as shown here and use a square and a visual check to confirm that the holes in the strips and the panel all line up correctly and that the two strips are also perfectly aligned – it would detract from the final result if they are not.

- Happy? Right, then using the pre-drilled hole in the strip, drill through the frame – you should find that the drill bit then passes straight through the pre-drilled hole in the strip below.

- At this stage, I decided to dry-fit the handle. Confirm the centres from the attachment screws.

- Mark them on the middle of the frame.

- Then use a gauge to centre the attachment screws on the frame – I used a piece of the frame offcut to set the gauge, as shown here.

- I substituted the set screws supplied with the handle, with 40mm screws, which would be recessed slightly into the underside of the frame’s top member.

- Having drilled the screw holes, I used a 12mmØ spade bit with a short length of tape as a depth stop, to drill the screw head recesses in the underside of the frame’s top member.

- Job done! After confirming the handle fitted properly I removed it and painted the frame – much easier to do without having to mask off the handle, right?

- Then I cut the feet, each from a piece of leftover 44x22mm SA pine, and 272mm long – this allows a foot of 120mm on either side – making the feet wide enough to keep the whole unit stable and not liable to topple over, but not so wide that you would bark your shins when walking past the unit. I also bevelled each end of each foot, as yet another ‘artistic flourish’.

- I painted each foot and once the paint was dry, attached them to the frame using the shelf brackets as shown here. I used 19mm screws to secure the brackets to the frame and feet.

- Then I attached the casters to the feet, using 19mm screws to secure each one

- Now back to finishing the panel attachment… why I left it to last is because it is far easier to work on the frame and feet without the weight of the panel, and it also ensures that the panel is far less likely to be damaged during construction. As a cushion between the panel holes and the securing 5mmØ threaded rods, and to completely insulate the steel rods from the panel, I wound electrical insulation tape around the rods – cut to about 45mm, as shown here. You need to ensure that the final fit is snug, but not so tight that you have to really push the taped portion of the rod into the hole in the panel and possibly damage it. The tape also serves to spread the load of the panel equally across all four attachment rods.

- This shows one of the taped rods sitting snugly in the panel. Note that the switch fitting on the panel is at the bottom of the whole unit.

- One of the completed fittings, using dome nuts and washers to secure the panel securely and safely within the frame.

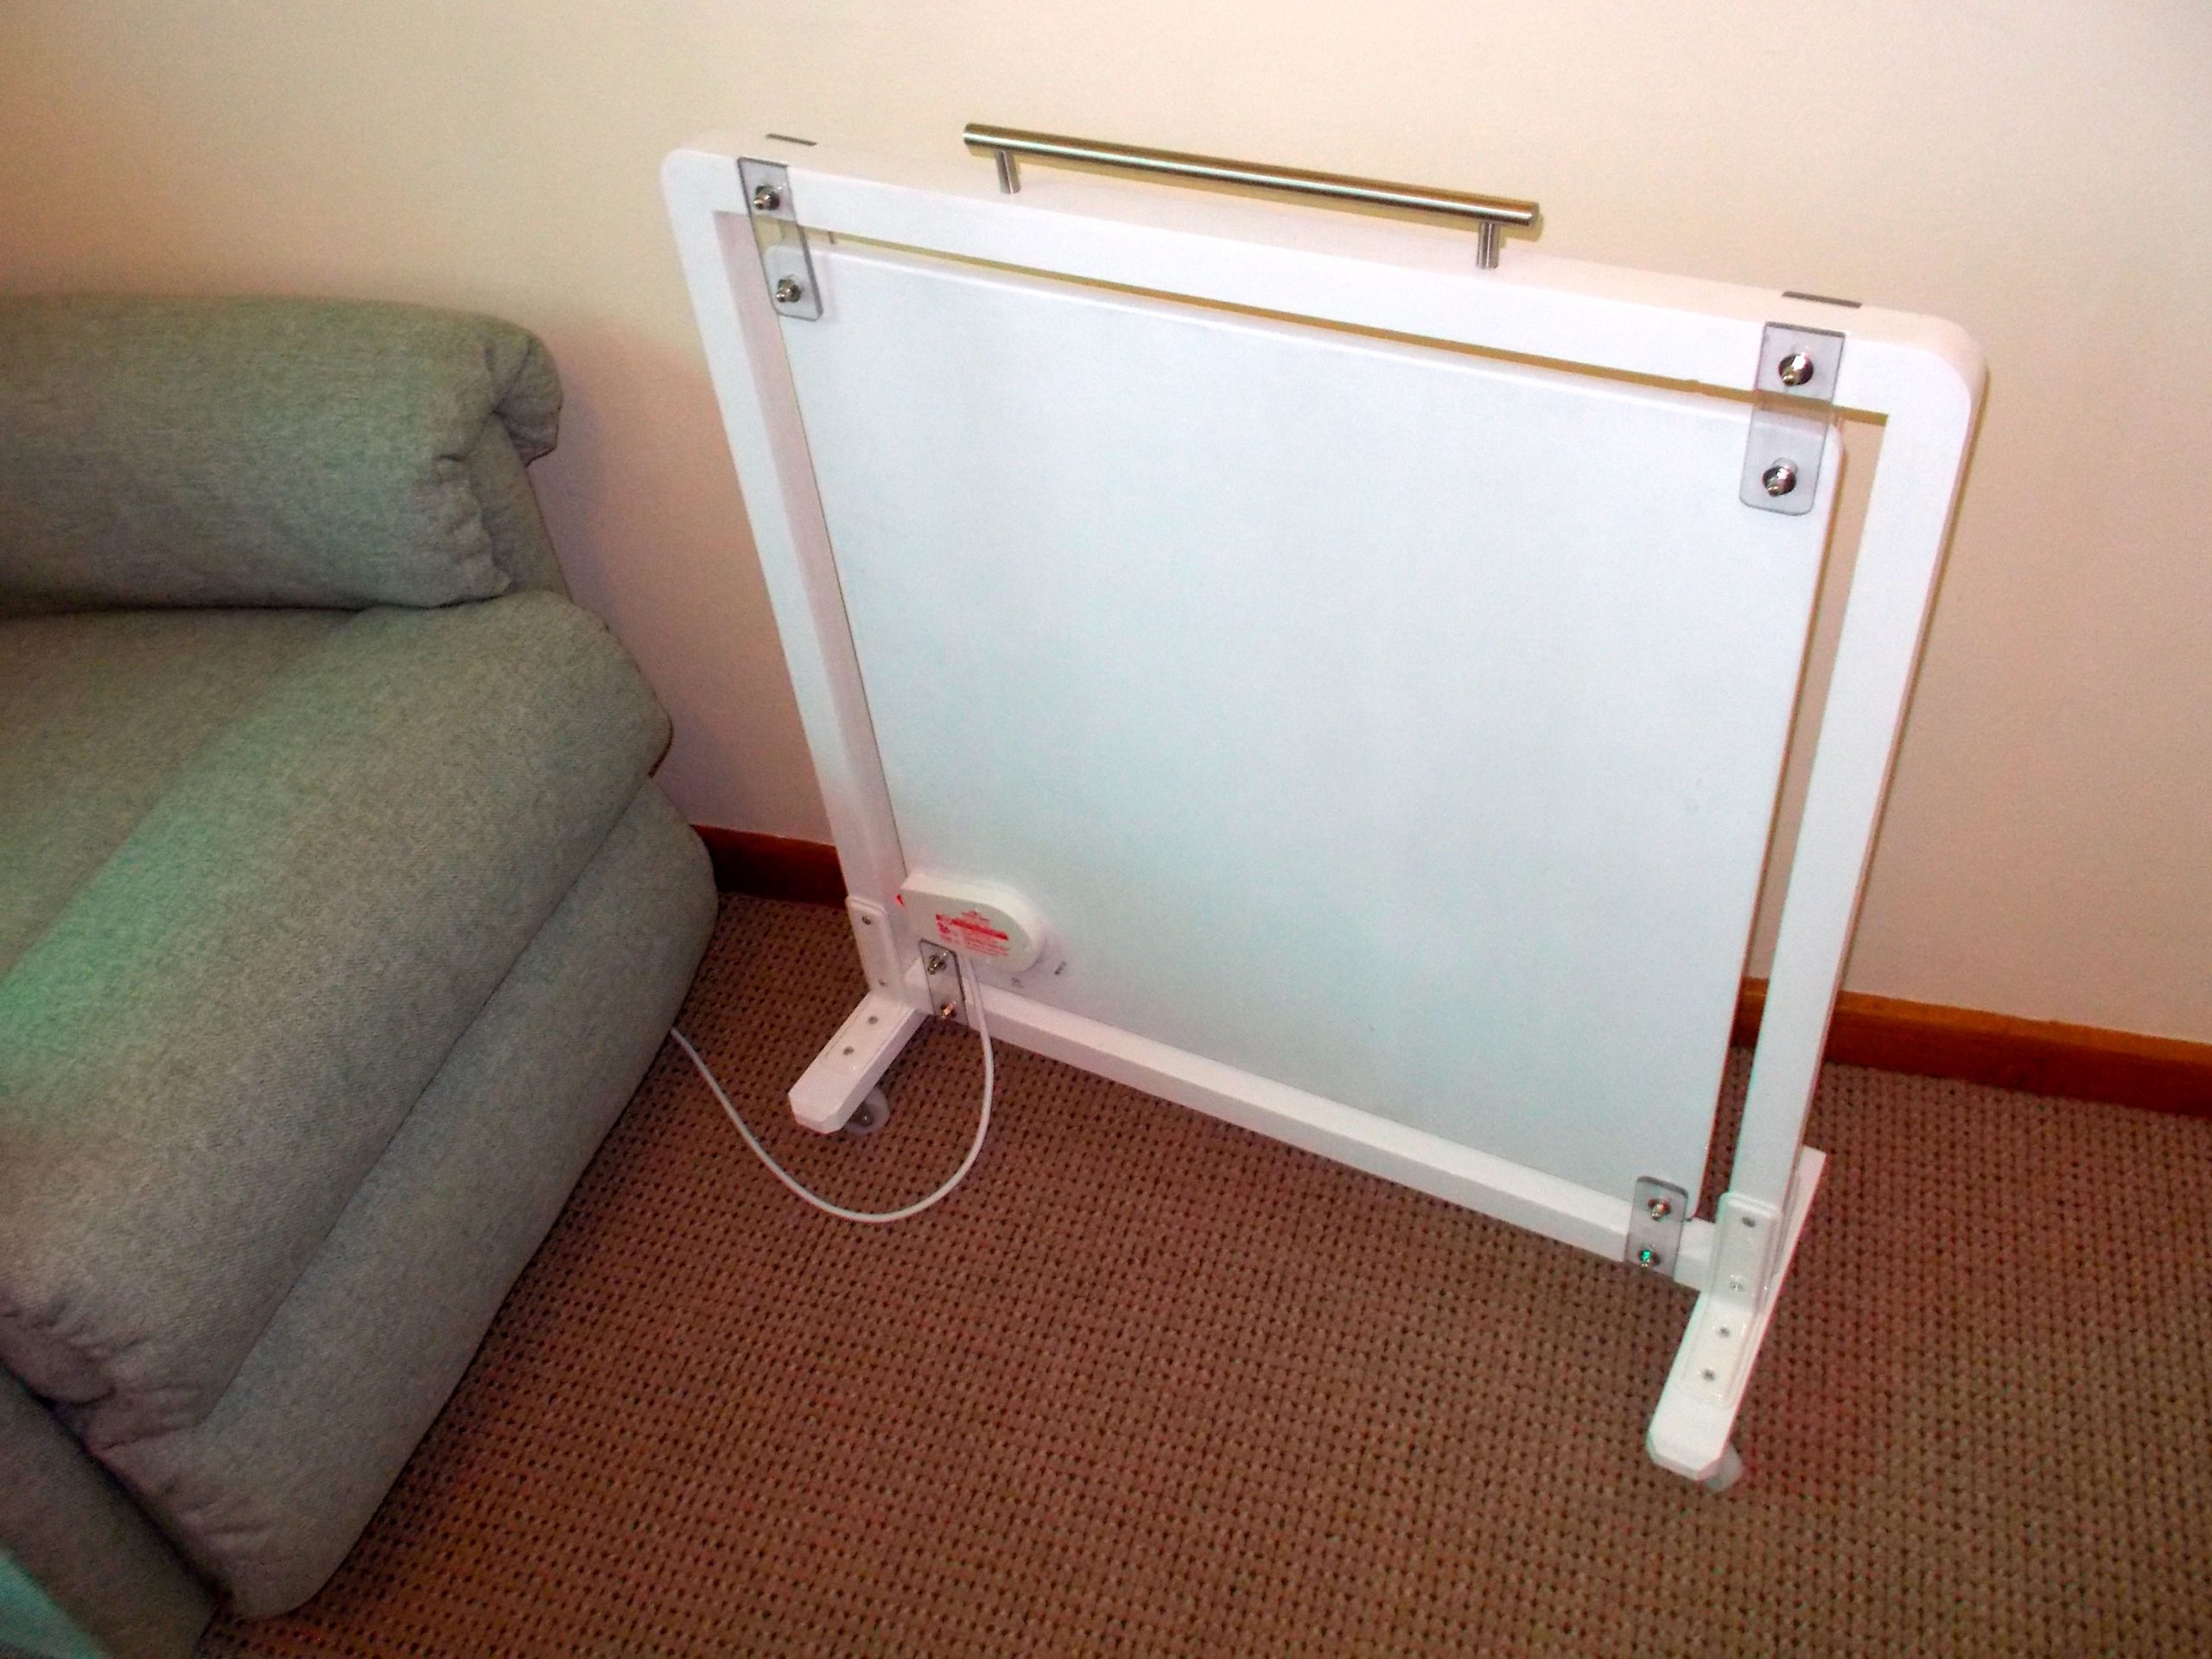
The finished unit – and like the perfect partner, warm and silent…
Note:
I always find it best to pre-sand the various pieces before I assemble any unit, with a final fine sanding just before applying the finish, and in this case, paint the frame and feet before attaching the panel and completing the project… it just makes thing a whole lot easier.
Panel:
These materials are available at Selected Mica Stores. To find your closest Mica and whether or not they stock the items required, please go to www.mica.co.za, find your store and call them. If your local Mica does not stock exactly what you need they will be able to order it for you or suggest an alternative product or a reputable source.
Project guide
TIME: 2-3 days
COST: R800 – R1000, depending on what wall heater brand you select and at what price you can obtain it.
Skill: 4
Assistant: No
Tools required: Jigsaw, mitre saw, sander – random orbital or orbital, router or wood chisel, hacksaw and mitre box socket or adjustable spanners to secure