18 April 2018

DIY – Kennel
Kennels can be picked up for good deals, however if you are a DIY enthusiast then here is a project that you will thoroughly enjoy.
- – Nutec – half a sheet (1220×1220)
- – Exterior 6mm ply – 1220×1220)
- – SA Pine: 22×96 – 2.4m; 32x32x2.4m; 22×44 – 2.4m
- – Laminated board – 600×800
- – Half sheet 3mm ply
- – 1x2m waterproof shade-cloth
- – 9×44 cover strip – 1.8m
- – 1 pack x 32mm Clout Nails
- – 50 x 40mm 8 gauge screws
- – Wood Glue
- – Finish of your choice – acrylic waterproof for the sides and a waterproof sealer for the base are a good idea.
- Mark off the entrance – about 225mm wide by 350mm sides and a peak of 400mm.

- Use a craft knife to cut both surfaces, and then simply break it along the cut line.

Use a jigsaw to cut the peak of the door. - The completed door cut out of the end. The full sides are 480mm, the peak is 600mm and the total width is 604mm.

- Place the side on the 6mm plywood reinforcement and use it as a template for the ply base. Repeat the procedure for the back without the door.

- The base is 600mm x 800mm with 22mm x 96mm sides. Use 40mm screws to attach the latter. These ensure that there is a separation between the surface on which the kennel is placed, and the kennel’s base, on which the pets will sleep.

- The base and the ends need to match with a play of about 2mm, so that the kennel body will drop on to the base and can be easily removed as well.

- This allows the kennel unit to be lifted off for cleaning.

- Mark off the sides – 465mm x 828mm, and repeat the procedure cut the ply reinforcing.

- The front end was made from 2 x 300mm – wide sections of Nutec, the two are joined, which is done using 22mm x 44mm.

- Avoid cracking the Nutec, by pre-drilling the holes for the 32mm clout nails.

- The two halves of the front are joined.

- Attach the 22mm x 44mm around the perimeter – other than at the base – which is 32mm in from the bottom edge so that it will fit over the base.

- The completed front and rear of the kennel.

- Apply a liberal coat of waterproof sealer to the inner surface of the base, and to its outer surfaces, to protect it against moisture.

- Attach the sides to the front and rear and cut the roof sections – each 1004mm x 450mm from the 3mm ply, check the roof for a good fit.

- Attach a beam of 32mm x 32mm between the peaks, to support the peak of the roof where the two halves meet.

- The roof is attached using just four screws per side, attach two attachment lengths of 22mm x 44mm, as shown, using glue and clout nails to attach them to the roof sections.

- They sit on the ends (as shown in the image), so the distance between their inner surfaces needs to be just on 828mm so that the roof sections sit on the front and rear sections of the kennel, and meet the sides as well.

- Align the front attachment length against the kennel’s front – I inset it 100mm to provide a little extra cover for the door – clamp the rear attachment piece into position and attach it used glue and clout nails as per the first attachment section.

- Having aligned the first pair of attachment lengths to the underside of one half of the roof – and checked that the fit is snug – I used the first roof section as a template for the second.

- Water does not flow up – unless pumped – so to stop water getting in under the rear of the roof, use a couple pieces of scrap ply and 9mm dowel, around which the waterproof shade-cloth would be wound and then anchored.

- Both roof sections; the front leading edge – is on the left. I attached lengths of 32mm x 32mm along the outer edges and the front to stiffen the roof and provide an anchor for the shade-cloth.

- Use a tacker to attach the shade-cloth to the roof sections; try to pull it as tight as you can, and make the corners as neat as you can.

- This is how the roof is attached to the ends; there are two other screws down towards where the sides meet the roof. This amounts to four screws per roof side, therefore eight all in all. To finish off before painting, I attached 9mm x 44mm cover strip to neaten each corner, and off-cut quadrant and moulding to embellish the door.

Project guide
Difficulty: Intermediate/Reasonably skilled
Estimated time: 2 days
Cost: R350-R500 (depending on the material used)
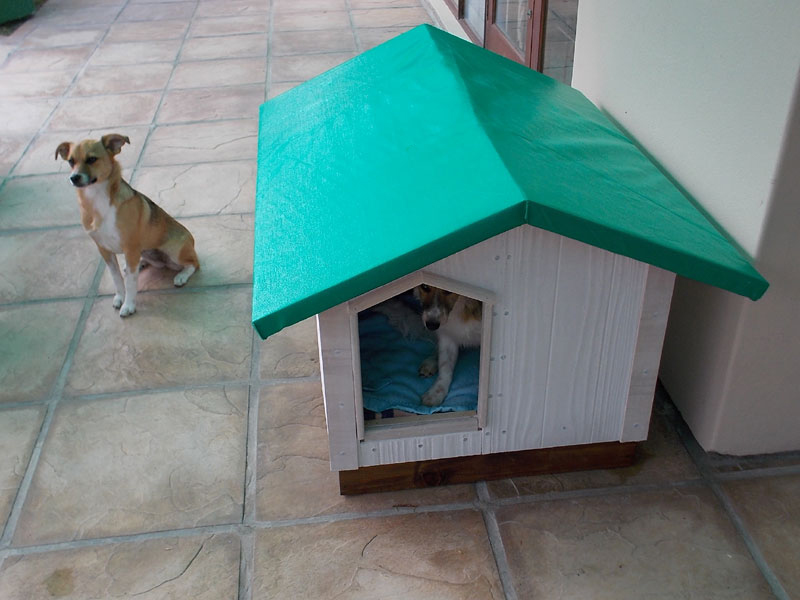
Completed Project :

