06 November 2018

Basic Safety and First Aid
Mica Hardware cares about your safety. We have compiled a list of Basic Safety Acts to take into consideration when faced with an intense scenario.
BASIC SAFETY:
You can never take too many precautions, rather be safe now than sorry later!
If you are faced with a major or minor injury, make sure to seek medical attention to be sure of the severity of the sustained injury.
It’s always handy to know a thing or two about first-aid, try take a class to learn the basics.
It is a good idea to have your doctor’s number and the local paramedic services/local emergency call centre numbers on speed dial on your mobile phone (along with your local police station, fire station and so on), and also listed next to your landline so that in an emergency you don’t have to flail about looking for numbers.
The essential first-aid kit
Every home should have a first aid kit, and it should be kept out of the reach of children.
These kits are essentially for minor injuries and ailments around the home – from cuts and sprains to headaches. However, it should also have what is required to treat more serious injuries while the patient is awaiting medical assistance.
The basic kit should comprise the following:
- Antiseptic solution for use with cotton wool when cleaning injuries.
- Antiseptic wipes.
- Two or three elasticised bandages.
- A range of plasters of different sizes and shapes.
- At least one roll of fabric-backed plaster plus a pair of blunt-nosed scissors.
- Tweezers.
- Cotton buds (ear buds).
- Two or three triangular bandages plus the same number of safety pins.
- Sterile dressings
- Antihistamine cream to treat insect bites and stings.
- Eye drops
- Sterile eye dressings
- Sterile eye wash
- Aspirin or paracetamol tablets.
- A pack of surgical gloves (check these every few months or so as they can deteriorate, in which case replaced them).
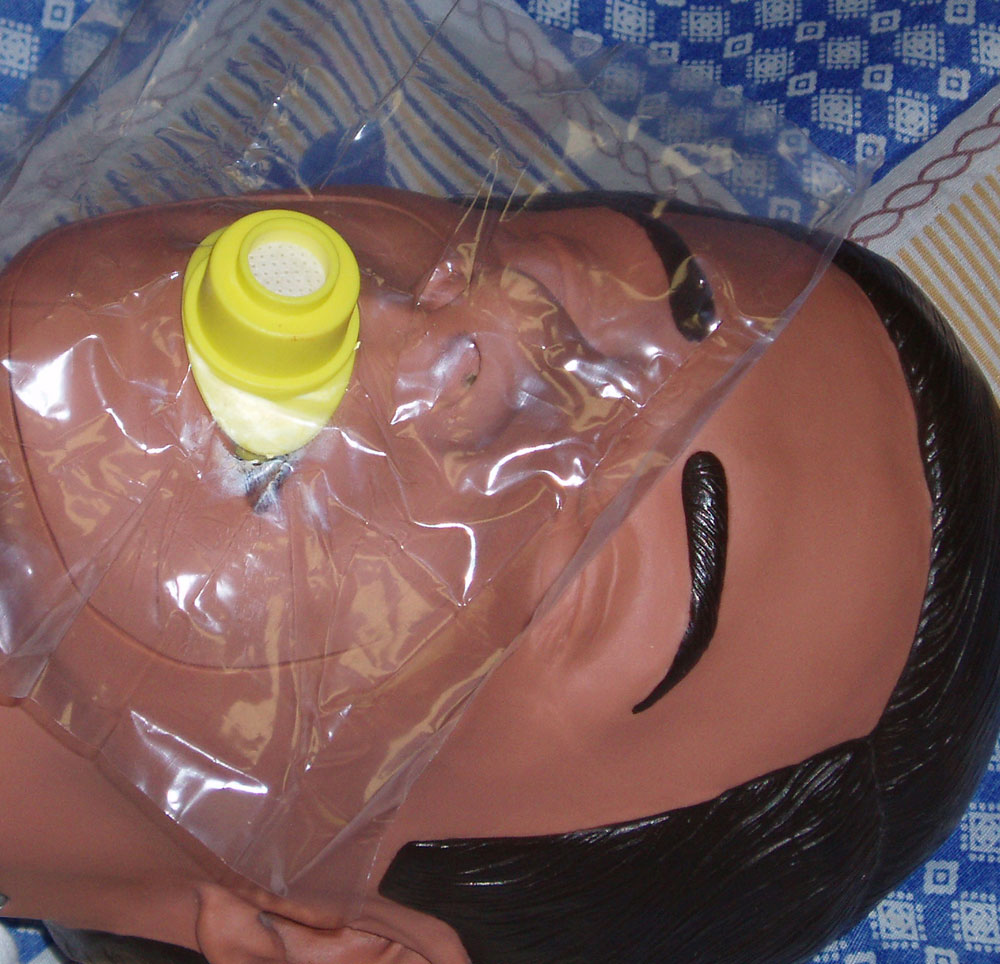
- Mouth-to-mouth device.
- Tubular bandage and application tongs for the treatment of injuries to fingers.
- Thermometer and/or heat-sensitive strip.
Points to remember:
- Where possible, pills should be those sealed in foil for longer life.
- Stick a sheet of paper into the inside of the kit’s lid, with all the important emergency numbers for your area.
- Make a habit of checking expiry dates of all the medicines in the home, plus and those in the first-aid kit, and return those that have expired to the pharmacy to be disposed of.
- Most people keep their medicines, plaster and so on in the bathroom. Rather keep them in a bedroom cupboard as the humidity in a bathroom can over time speed deterioration in plasters, for example.
Sprains and fractures


A sprain occurs when the ligaments around a joint are suddenly stretched or torn, whereas a fracture is a partial or complete breakage of a bone. In the case of the former, signs are pain, tenderness and swelling around a joint. Make the patient as comfortable as possible and raise the injured limb. Then apply a cold compress to the joint, winding the bandage around the joint, to help support it in one position.
Fractures are far more serious. The patient might have heard or felt a bone break, there may be a deformity of the limb in the region of the fracture, swelling and, later, bruising, pain, tenderness and an inability to move the limb properly if at all.
Do not move the injured limb or part of the body unnecessarily. Support the limb by hand or by tying a splint to it – putting pads between the splint and any parts of a limb where a bone would be pressed hard against the hard material of the splint, for example the knee.
Get the patient medical attention, and ensure that the fractured limb is supported during the trip to prevent any unnecessary movement.
Splinters… small but painful

Anyone who says the small things don’t matter hasn’t had a splinter embedded in their skin.
If this occurs, wash the area. Then use tweezers that have been sterilised in a flame to remove it. If the splinter is too deep, however, do not probe the skin for it – it could cause an infection. Rather go to your doctor have it removed.
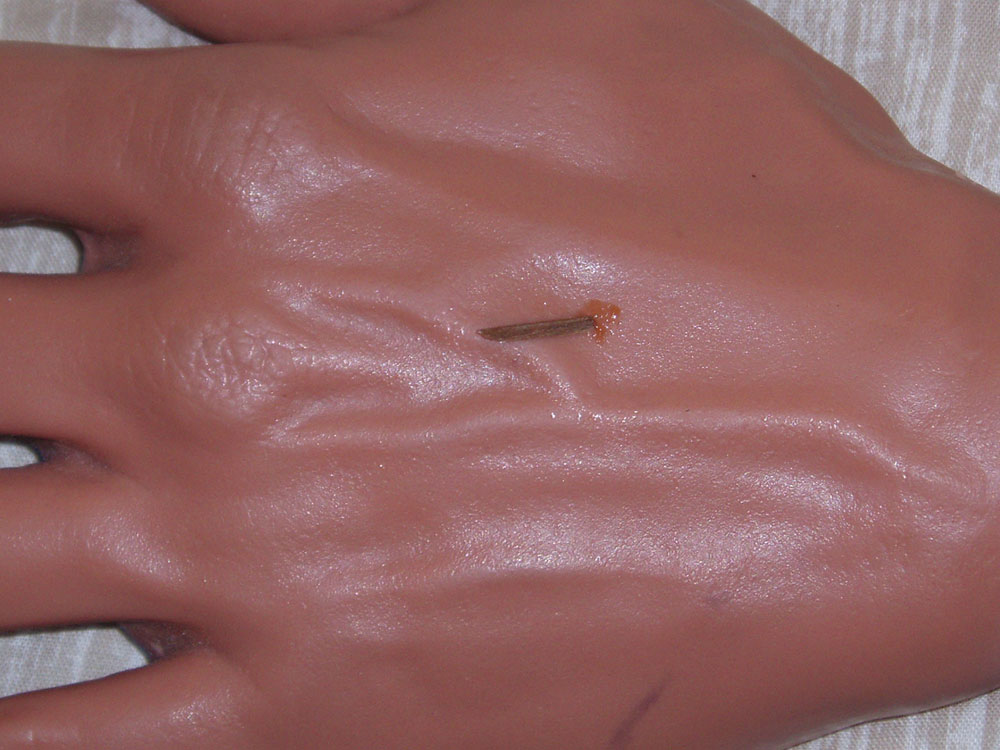
Penetrating injuries
The first impulse when someone suffers a penetrating injury is to pull out the object. It is recommended that you do not by all means remove the object as It might have severed a major blood vessel and could be sealing the injury therefore by removing it, it could result in severe bleeding.
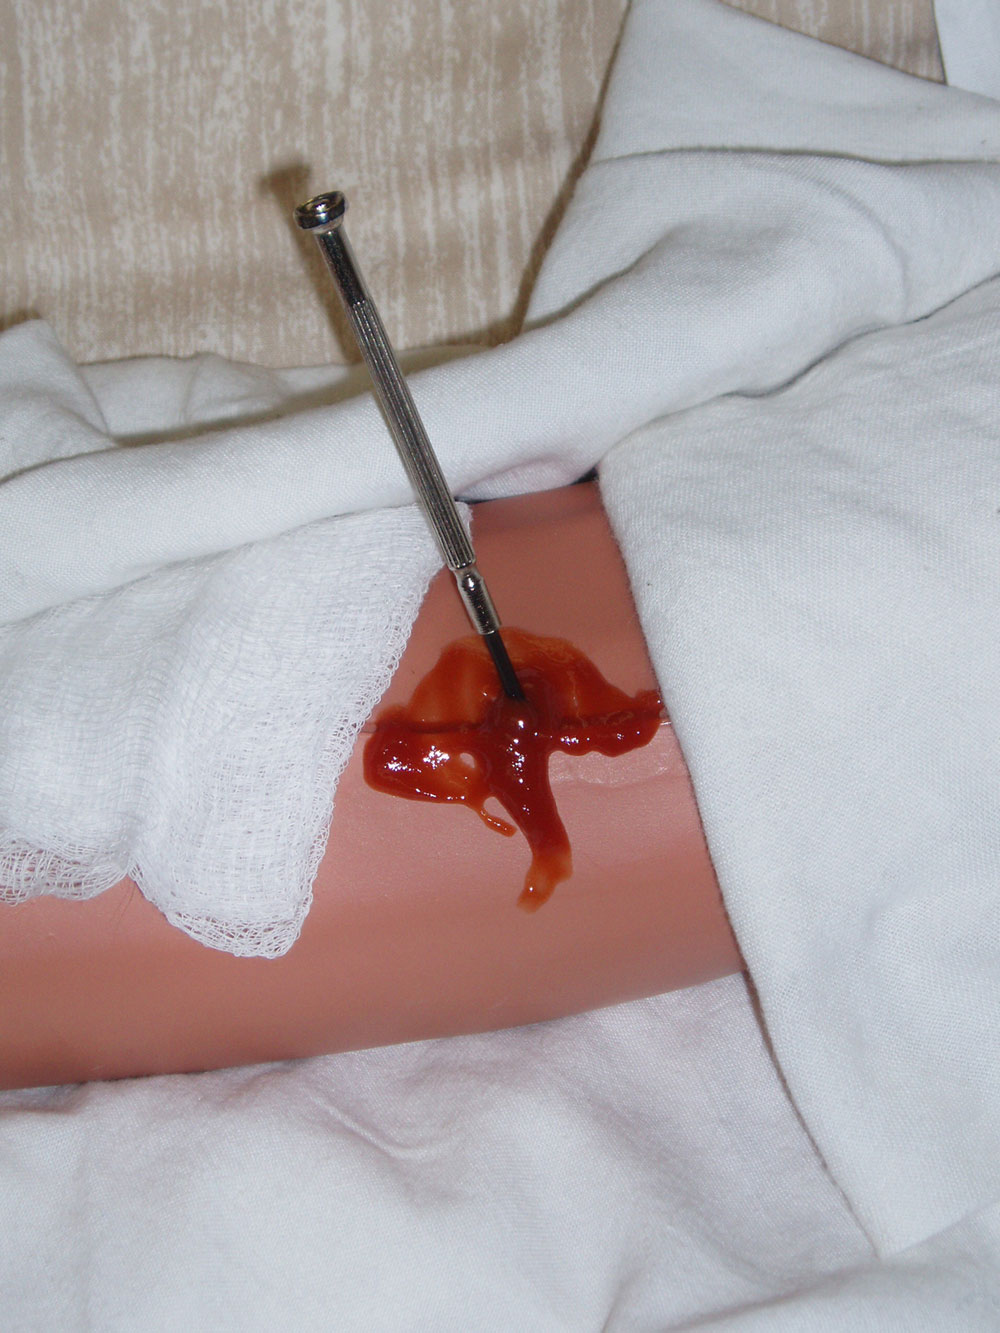
The correct thing to do is make up a ring bandage and place it over the injury and then use a bandage to hold it firmly in position. The objective is to support the object and prevent any movement of it in the injury as even a slight movement could make the injury more serious. Then get the patient to medical attention.
- Fold a sheet of linen into a narrow strip, or use a narrow bandage. Wrap this loosely around your hand a few times, and then start passing the end around the loop you have made until you create what resembles a fabric doughnut.
- Once you have completed the ring, which should be reasonably firm, place it over the injury, taking care not to disturb the object in the injury.
- Fix the ring in position with a roller bandage. Ensure that you do not tie the bandage over the object, pushing it further into the injury. It should not touch it other than on its sides to hold it in position.
There is another type of penetrating injury one needs to be aware of and that is one in the chest. It requires immediate medical attention.
An open chest injury is often called a “sucking chest injury” a sign that a lung has been punctured is any one or a combination of the following:
- Sucking sound coming from chest injury.
- Frothy blood issuing from the injury (bubbles of blood are caused by air going in and out of the injury.)
- Blood is coughed up.
- Shortness of breath or other difficulty in breathing.
- Chest not rising normally when the casualty inhales.
- Pain in the shoulder or chest area which increases with breathing.
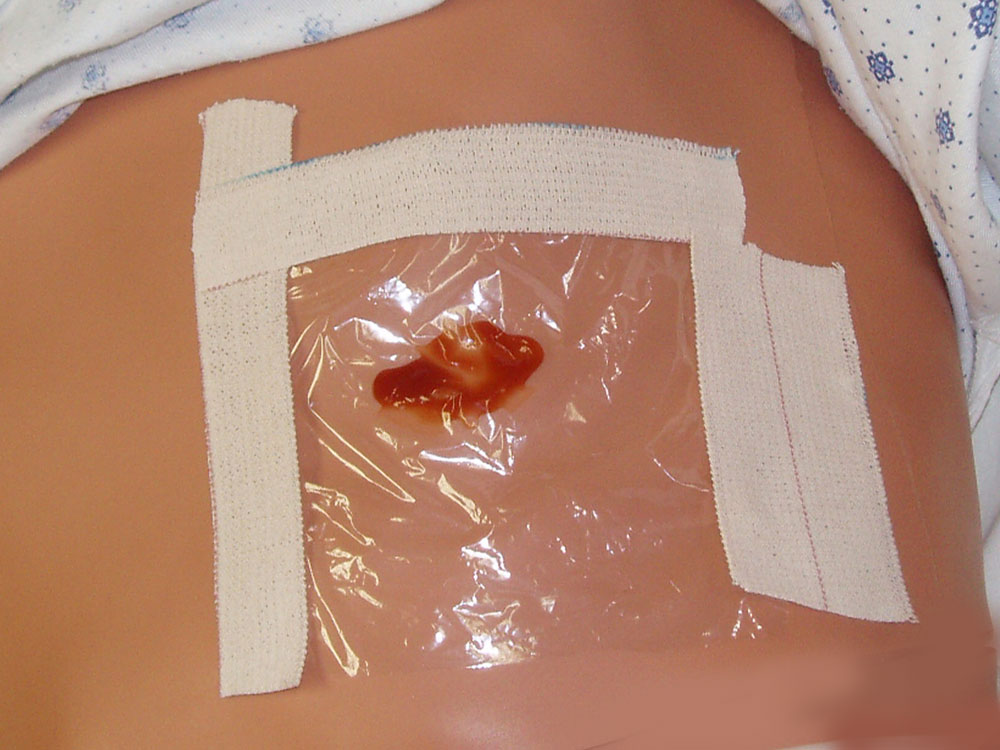
The aim in this case is to stop blood being drawn into the lung when the patient inhales, and to stop the lung collapsing when they exhale and to try to ensure that all or as much of the air the patient inhales and exhales is via the trachea.
What you need is surgical tape from your first aid kit, and a sheet of clean plastic, cellophane or sheet. Pouring a domestic antiseptic such as Dettol or Savlon over the sheet will help prevent infection of the injury. The sheet should be large enough to extend at least 50-60mm beyond the injury in any direction.
Tape the top and both sides of the plastic to the casualty’s chest, but leave the bottom edge untapped to form a flutter-type valve to allow air to escape through the chest injury, but keep air from entering the chest injury.
As the patient inhales, the plastic is pulled down against the injury and stops air being drawn in. As the patient exhales, the plastic sheet allows any blood that has seeped from the injury, to escape.
Position the patient on their side with the injured side next to the ground. This allows the uninjured lung to inflate as normally as possible.
If the patient would be more comfortable and breathe easier when sitting up, then allow the patient to sit back against a wall or other support. (If the plastic sheet was positioned to assist the patient when lying down, then the tape need to be repositioned if necessary so that the bottom edge of the sheet is still untapped.
Injuries – the do’s and don’ts
The basic rule with first aid and any condition is: if you don’t know what you’re doing – don’t! Having said that, if you have prepared yourself beforehand, for a range of situations, you will know what to do, and will be able to be of help in an emergency.
If that is the case, it will help you stay calm, and this is often vital, particularly as the patient is likely to be in shock or pain, and prone to panic.
The key is knowledge – that will enable you to know what to do, and equally important, what not to do, and it will enable you to improvise, to use items to achieve a certain result.
Poisoned?
A poison is a substance that when taken into the body in sufficient quantity affects the workings of the body and its organs either temporarily or more permanently, possibly damaging parts of the body, and in the worst case, causing death. Many accidental cases occur because dangerous substances have been stored in cool-drink bottles and a child has drunk some.
If the patient is conscious, try to find out what they drank. If they are unconscious, check for any possible cause of the problem. Symptoms of poisoning include stomach pain, delirium, convulsions, retching or vomiting, burns around the mouth, throat and gullet and pain in those areas. The patient might also suffer from diarrhoea, have difficulty breathing and lose consciousness.
If they have swallowed a substance that burns such as bleach, give them about 500ml of milk or water to dilute the poison in the stomach.
If they are unconscious, place them in the recovery position and call for medical attention.

Poisoning can also occur from spider bites, snakebites and poisonous plants. Wherever possible try to identify the species that caused the problem and seek medical attention immediately. Symptoms of poisoning from these causes often include the following: vomiting, nausea, difficulty in breathing, headache, shock, sharp pain and swelling around the site of a bite, one or two puncture injuries, blurred vision. If breathing stops, begin artificial ventilation immediately. If the patient is conscious, carry them to a vehicle and get them to medical attention. Keep them calm and their movements as slight and as non-strenuous as possible. This is because anything that causes the heart to beat harder will distribute the poison around their body quicker – and the aim is to keep it as localised as possible.
Snakebite!
The first sign of a bite is usually a sharp pain and swelling around the site of the bite – usually two small puncture injuries. It could be only one puncture, however, if the snake managed to get only one fang to penetrate the skin. Therefore, do not assume one mark can only be a sting.
The patient might start having difficulty seeing properly, they may feel nauseous, may vomit, and they may have difficulty breathing.
Keep the patient still and calm, and reassure them – the vast majority of patients survive being bitten by a snake, but fear can bring on shock. The site of the bite should be kept below the level of the heart, so if the person has been bitten on the ankle, sit them against a wall or tree, or, if you’re on a slope, lie them down, with their feet down-slope.
Wipe any venom away from the bite site. Apply a dry, sterile dressing to the injury and encourage the patient to keep still.
If the snake is still around, try to identify it, and summon medical attention if it is a poisonous species (there are excellent books available that will help you identify the various species).
If the patient stops breathing, begin mouth-to-mouth ventilation immediately.
Do not tie a tourniquet around the limb above the bite and do not try to suck the poison out of the bite or cut it in an effort to make it bleed.
Keep the patient calm and carry them to a car to get them to hospital, if that is the course of action you have to take. The less they move, the lower their heart rate will be.
CPR – Artificial ventilation
This is when a person ceases to breathe. The reason for the condition might be a blockage of the airway, or the result of an electric shock. The prime concern is to get them breathing again, and if their heart has ceased beating, get that restarted as well.

- Attempt to wake patient. If the patient is not breathing (or is just gasping for air), proceed by loosening their tight clothing while retaining the patient’s dignity, call the emergency services immediately and go to step 2. If someone else is there to help, one of you should call the emergency services while the other moves on to step 2.
- Begin chest compressions. If the patient is not breathing, place the heel of your hand in the middle of his or her chest on the breastbone (sternum). Put your other hand on top of the first with your fingers interlaced and raised, with the heel of the hand against the patient’s chest. Compress the chest at least 40-50mm. Allow the chest to completely recoil before the next compression. Compress the chest at a rate of at least 100 pushes per minute. Perform 30 compressions at this rate (should take you about 18 seconds).
If you are not trained in CPR, continue to do chest compressions until help arrives or the patient wakes up.
It’s normal to feel pops and snaps when you first begin chest compressions.
- Begin rescue breathing. If you have been trained in CPR, after 30 compressions, open the patient’s airway using the head-tilt, chin-lift method. Pinch the patient’s nose and make a seal over the patient’s mouth with yours. Use a CPR mask if available. Give the patient a breath big enough to make the chest rise. Let the chest fall, and then repeat the rescue breath once more. If the chest doesn’t rise on the first breath, reposition the head and try again. Whether it works on the second try or not, go to step 4.
If you don’t feel comfortable with this step, just continue to do chest compressions at a rate of at least 100/minute.
- Repeat chest compressions. Do 30 more chest compressions just like you did the first time.
- Repeat rescue breaths. Give 2 more breaths just like you did in step 3.
- Keep going. Repeat steps 4 and 5 for about two minutes (about 5 cycles of 30 compressions and 2 rescue breaths).
- After 2 minutes of chest compressions and rescue breaths, stop compressions and recheck patient for breathing. If the patient is still not breathing, continue CPR starting with chest compressions.
- Repeat the process, checking for breathing every 2 minutes (5 cycles or so), until help arrives. If the patient wakes up, stop CPR and place the patient in the recovery position.
A universal compression to ventilation ratio of 30:2 is recommended for adult and in children/infant if only a single rescuer is present. If at least 2 rescuers are present a ratio of 15:2 is preferred in children and infants. In newborns a rate of 3:1 is recommended unless a cardiac cause is known in which case a 15:2 ratio is reasonable.
- Place the patient in the recovery position.
Heart attack!
Heart attacks are potentially life-threatening and if anyone tells you they have a severe chest pain, which can spread to one or both arms, neck and jaw, suspect a heart attack. The patient might also feel faint, giddy, be breathless and sweat a great deal. The pain comes on suddenly.
Place the patient on the floor in a half sitting position, head and shoulders supported with pillows or cushions, and their knees bent.
Loosen clothing around the neck, chest and waist, reassure them and keep them still, and summon medical help immediately.
Should the patient pass out, place them in the recovery position.
Concussion
Many tasks around the home and garden call for you to mount ladders and chairs – and one slip can end up with you suffering a concussion. And you won’t necessarily pass out.
Signs to look for in the unconscious patient are shallow breathing, a weak but rapid pulse, pale skin tone, and skin cold and clammy to the touch.
In the conscious patient, or once the patient has regained consciousness, he or she might feel nauseous, or already be vomiting, and they might also not be able to remember what happened immediately prior to the incident. If they are unable to answer simple questions such as the date, time, or their name, concussion is probably the cause.
Seek medical attention, as a more serious condition called compression could develop.
Burns – the dos and don’ts

First of all, what causes burns?
- Thermal burns: This type burn results from heat – and heat is the most common cause of injuries and has two basic sources…
- Dry heat – this can have a range of sources such as the sun, electricity, fire, radiation, friction, heated objects (such as a hot pot),
- Wet heat – this comes from steam or hot liquids. For instance, steam from a kettle, or hot soup spilt on the hands.
Thermal burns can occur as a result of a braai fire, fire in fireplace in the home, vehicle fires, kitchen accidents and even having your hot water geyser thermostat set too high a temperature. Remember, if you have a child in the home, or even if you do not and only adults are resident, it is wise to set your thermostat to 55°C or thereabouts. Cooler is better than hotter – and far safer.
- Chemical burns: This type of burn is caused by chemicals that are strongly acidic or alkaline – and they can be found in your own home such as pool chemicals, cleaning products you use to clean your laundry, clean your toilets, unplug your drains. All of these and others can cause serious chemical burns, as can battery acid, which is found in car batteries.
Generally, the common symptoms associated with chemical burns include:
- Blackened or dead skin; this is mainly seen in chemical burns from acid.
- Irritation, redness, or burning in the affected area.
- Numbness or pain in the affected area.
As with thermal burns, the area affected and its location matter. Chemical burns on the eyes, respiratory system, buttocks, face, and groin are deemed more serious than the same sort of burn of similar severity elsewhere on the body.
- Like thermal burns, the severity some chemical burns can injure more than one layer of skin. This means chemical burns can be more susceptible to infection and other problems.
Chemical burn treatment:
One issue with chemical burns is that their actual impact might not be immediately apparent and your best course of action is to seek medical attention immediately.
- If the chemical is a dry powder, sweep it off the patient, ensuring that you sweep away from sensitive areas.
- If the patient is lying in a pool of the chemical, get them away from it.
- Remove any clothing that has become saturated with the chemical; you won’t only remove the source of the burn, but also the duration to which the patient is subjected to it.
- Some authorities recommend rinsing the affected area continuously with clean water as soon as possible to remove any residual chemical. When doing so, however, ensure the water runs off the affected area while passing over other areas as little as possible and without pooling on the skin and possibly spreading the chemical to a wider area.
- Only use water – do not rub or wipe the area.
Burns range in severity from minor to serious to life threatening, depending on their size, situation and depth, and unless they are clearly minor, your doctor should see burns and scalds, as they could be more serious than you first thought.
Burns are rated by their severity, and there are six types:
- First-degree: these burns result in pain and reddening of the outer layer of the skin (the epidermis), so quite severe sunburn could be rated as a first-degree burn. These burns are considered mild compared to other burns but at all times the golden rule is: if the condition worsens, or there are any side effects or any doubt whatsoever as to the severity of the burn, seek medical attention – and do so immediately.
- Second-degree: these affect the outer layer (epidermis) and lower layer (the dermis) of the skin and cause pain, redness, swelling, and blistering. Seek immediate medical attention with this burn and all of the following and do not run cool or cold water over them.
- Third-degree: These burns are termed full thickness burns as they penetrate both layers of the skin and the tissue below them, resulting in white or blackened, charred skin. Beware of the fact that a patient of such a burn might not feel a great deal of pain as the area might be numb and might therefore underrate its impact.
- Fourth-degree: These burns penetrate entirely through the skin and begin to burn the underlying muscle and ligaments.
- Fifth -degree burns: These penetrate the muscle and begin to burn bone.
- Sixth-degree burns: These are the most severe and result in charred bone.
Remove any ring, watch or other item of jewellery and loosen any tight clothing near the site of the burn, in case any swelling develops. If a ring cannot be removed, use a pair of side-cutters to cut it at the narrowest, thinnest part of the band, bend it open and remove it… it can be expertly repaired afterwards.
Treat any burn other than one that is clearly minor, as serious – and do not assume that the absence of pain means the burn is minor. If the skin is grey, charred, or peeling, the nerves have probably been damaged and the burn is serious. Do not run cold water over this sort of burn.
Do not apply fat, butter, margarine, lotion or any other substance to the injury area
Do not burst any blister or remove any loose skin or interfere with the burn area at all
Do not peel away any clothing or other material that is sticking to the burn
Do not use ice, ice water or even very cold water – use only cool water
Do not give a severely burned person anything by mouth or place a pillow under their head if there is an airway burn as this can cause an airway obstruction.
Bee sting
Bee stings are quite common and not life-threatening unless the patient is allergic to this sort of sting. If they are, they could suffer a severe allergic reaction called anaphylaxis which is potentially life-threatening and requires emergency treatment. This type of shock is referred to as anaphylactic shock.
Signs of anaphylactic shock are
- Skin reactions such as hives, flushed skin, or pale skin.
- A feeling of suddenly feeling too warm.
- A feeling like of a lump in the throat or difficulty swallowing.
- Nausea, vomiting, or diarrhoea.
- Abdominal pain.
- A weak and rapid pulse.
- Runny nose and sneezing.
- Swollen tongue or lips.
Usually, however, consequences of a bee sting are less serious and tend to be limited to where much of the pain results when another person, trying to help, uses tweezers to grab the sac at the end of the sting and pull it out.
It does usually work – the sting comes out, but as the sac has been squeezed in the process, the venom in it has been pushed into the patient.
If you do not have fine-pointed tweezers that enable you to grip the sting below the sac, simply use the back of a knife blade or the edge of a credit card to scrape the sting out of the skin. Hold the blade – blunt side leading – or the card at a flat angle to the skin, and gently sweep the sting out. Signs of the sting should vanish soon thereafter. Use a cold compress to speed relief, but if symptoms continue for more than a few hours, consult your doctor.
Some home remedies to ease discomfort after a bee sting include:
- Applying some honey to the area of the sting may help with injury healing, pain, and itching.
- A paste made of baking soda and water can help neutralise bee venom to reduce pain, itching, and swelling.
- Apple cider vinegar.
- Toothpaste.
- Meat tenderiser.
- Wet aspirin tablet.
The golden rule with all injuries in the garden and home is when in any doubt whatsoever seek medical attention as soon as possible.
Abrasions and cuts

A cut or abrasion can be trifling, or terrible – it depends on what caused it and the amount of force involved. If it is minor, wash the injury under running water and then treat it with a mild antiseptic, and cover it with a plaster or gauze pad. Tissue paper will quickly absorb any moisture on skin surrounding the injury and allow a plaster to adhere to the skin. Be careful not to touch the injury itself – you don’t want any tissue fibres getting into it.
If the injury is such that bleeding is severe, your main task is to control that first. If the injury is to a limb, raise it above chest level to reduce the pressure of the blood flow and apply firm pressure directly on to the injury by holding a pad of gauze on the injury. This flattens the blood vessels, slows the blood flow and gives more time for clots to form. If blood soaks through the pad, do not remove it, but place another pad on top of it, and continue until bleeding stops or medical assistance is available.
Bandaging injuries
Generally, injuries around the home involve cuts, bruises, sprains and fractures, and less common, penetrating injuries, and the golden rule with bandaging in all these instances is: Not too tight!
Bandages are applied for any one or a combination of reasons. For instance, it may be necessary to support a limb, apply pressure to an injury to slow or prevent bleeding, hold a limb in the same position, hold a splint in position, or prevent dirt entering an injury.
It is as well to ensure your first-aid kit in the home includes a variety of bandages. Crepe or elasticised roller bandages are versatile and simple to use.
Applying an even tension, and rolling the bandage around the limb, bandage the limb to about three bandage widths above and below the injury. If it is a pressure bandage to slow bleeding, finish off with a reef knot, tied directly over the injury. In other cases, if tying a knot, make sure it is clear of the injury.
Beware of applying a bandage too tightly. If the patient is conscious, confirm their toes or fingers are not tingling, and that they still have feeling in the extremities. If not, if the extremities are cold to the touch and/or turn blue, the bandage is too tight and should be reapplied with less tension.
Triangular bandages are used for a number of applications, such as supporting an injured arm, completely enveloping a foot or hand, and bandaging the head. In these applications, they are not pressure bandages and will not prevent bleeding. They are used to protect injuries such as burns and grazes where bleeding is not the major concern.
Ring bandages, are used in cases of penetration injuries where a foreign object is protruding from the injury, or in the case of a fracture, when the end of the bone is protruding.
Beat those blisters
Generally, the blisters you are most likely to suffer in the home are due to burns, friction, a reaction to a plant, an insect bite or sting, or in the case of a blood blister, bad aim when using a tool such as a hammer.
First rule – don’t burst a blister unless the pressure of the fluid is causing discomfort. If you do puncture it, cover it with a light gauze pad to keep grime out, but allow it to “breathe”. If it becomes infected, get medical attention.
Disclaimer:
The information provided here has been approved by a practicing physician, but it is provided as a guide. Hence, in all medical emergencies, incidents or accidents, if in ANY doubt whatsoever as to the severity of the injury to the patient, seek medical and/or paramedic assistance.’
What to do when calling for medical assistance:
- Provide your name, telephone number and your physical address where the emergency has occurred.
- Give a brief description of what has happened and the result… ’My husband fell of a ladder and is unconscious.’
- Do not hang up until the operator tells you to – he or she might need further information from you.
- Send a family member to the road outside so that they can attract the attention of the medical team – every second lost when they are looking for the address could be vital.