26 November 2015

Make Your Own Lamp
This bedside light will take you only a couple of hours to make and the design means you can select a higher column if you wish and make a free-standing lamp or even a standard lamp. Just bear in mind that the higher you make the unit, the broader the base needs to be to ensure stability – so adapt the materials list accordingly.
The beauty of this project is that it combines a little simple woodwork with some simple electrical work – well within the reach of the average DIY enthusiast.
Bear in mind, however, that if you are in any doubt whatsoever with regards to your capabilities when it comes to electrical work – even simple connections like the ones use here, rather get a professional to make the connections for you.
Project Guide:
Difficulty: Novice/Intermediate
Estimated time: 2 days
Cost: R100-R150 (depending on the shade)
Materials: (measurements in metres and millimetres) (Ø = diameter)
- Meranti dowels:
- two 25mm Ø 913mm;
- two 10mm Ø;
- one offcut of 22x222mm for the base;
- cold glue;
- four pads (self adhesive or attached with a screw each – we selected the latter);
- four 25mm screws;
- four 60mm screws;
- flex; toggle switch;
- bulb fitting with 44mm base plate;
- finish of your choice – we selected a clear varnish.
- Lampshade of your choice.
*All materials are available at Selected Mica Stores. To find your nearest Mica and to enquire about availability, please go to www.mica.co.za, to use our store locator. If your local Mica does not stock exactly what you need they will be able to order or suggest an alternative product or a reputable source.
Method:
- The basic components for the bedside lamp.
- Cut the two lengths of 25mm Ø to the required length. In this case, we cut them to 300mm.
- Repeat with the 10mm Ø dowels and here are the pieces for the central column.
- Begin with the 25mm Ø lengths. The two 10mm Ø bits visible are offcuts of the 10mm Ø dowels and will be used to ensure the four dowels are in a square configuration. Serendipitously, a 10mm Ø dowel fits snugly between the main dowels.
- Holding the dowels in place with a couple of rubber bands, apply glue along the four junctions as shown. Note the spacer dowel keeping the 25mm Ø dowels squared up.
- Now slide each 10mm Ø dowel into position as shown. Note: ensure you align the ends precisely.
- Now go wild with rubber bands.
- Here is a top view to show how the dowels are arranged. Now set the column aside for the glue to cure.
- Time to get on with the base… We cut ours from an offcut of 22x222mm meranti. We cut the base as a square…
- Now mark off the centre of the base.
- We wanted an octagonal base so each side is about 78mm.
- Drill a 6mm hole at the centre for the cord.
- Then sand down the base – it is often easier to sand the individual pieces before assembly.
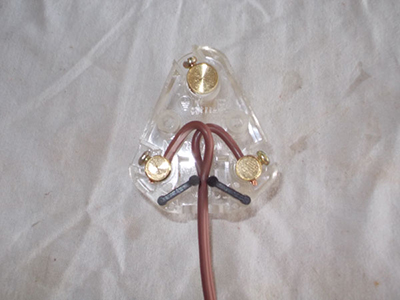
- Still waiting for the column to cure, we got started on the electrical side. The cord is twin flex, so strip the last 8mm or so of the wire of insulation and connect them to the two small pins as shown. NOTE: With these connections, polarity does not matter, but in some cases it does matter so as a rule follow the convention when connecting a three-core flex to a plug as follows: With the plug pins facing away from you, the bLue wire is connected Left (Neutral) small pin and the bRown wire is connected to the Right (Live) pin. The Earth wire – that with the green and yellow insulation IS ALWAYS attached to the TOP large pin.
- Connecting the toggle switch… Some people make the mistake of cutting back the cord to be connected to the switch terminals. Don’t.
- Remove 8mm or so of insulation as shown.
- Make the connection and replace the cover.
- Once the glue has cured, position the bulb-fitting base as shown (we drilled two extra holes.
- Mark the positions of the holes and drill 2mm pilots holes for the base’s 25mm attachment screws – try to ensure each screw will go through the centre of its respective 25mm Ø dowel.
- The base attached – and serving a second purpose of helping to keep the column together – not that it needs much help.
- Position the base of the column dead centre on the base and very lightly mark the position.
- Using the marks as a guide, drill 3mm holes for the attachment 60mm screws so that they will pass up through the centres of their respective 25mm Ø dowels. Apply glue, position the column on the marks and set aside for the glue to cure.
- Once the glue has set, from then underside of the base, drill a 2mm pilot hole into the base of each 25mm Ø dowel.
- Then firmly fix the column to the base with the four 60mm screws. Ensure you countersink the screw heads so that they are well clear of the surface on which the lamp will rest. We also attached four pads, as shown. They are so-called ‘glider pads’ and are very easy on any surface on which the lamp will be placed.
- Pass the end of the flex down the centre of the column and strip the last 8mm or so of insulation as shown.
- Then make the connections.
- Ensure that you leave plenty of length for the flex.
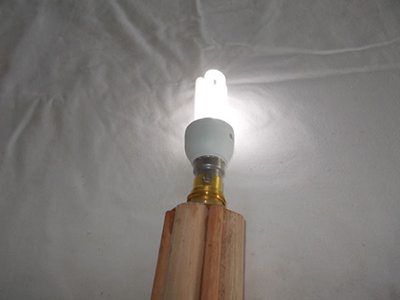
- A quick test to ensure everything is working as it should and then it was simply a matter of applying the finish. Three coats, with a light sanding after the first and second, and the lamp was ready to take a shine to any room.
- And there we have it – light (until the next loadshedding, that is…)